Showing posts with label DIY. Show all posts

Tuesday, July 2, 2013

DIY Wedding Invitations

Good Morning, lovelies! It's been a while! I had the entire week last week off from work and, quite frankly, I just didn't really care to post much. But now that I'm back on the work grind, you get me back.

Since I didn't had the week off of work and Michigan decided to be overcast with a side of monsoon, I had a lot of time to get some wedding planning done and out of the way. The biggest accomplishment? Finishing invites and sending them out. A while ago I shared that I was making the invites myself. Listen, I saved a whole lot of money doing it myself, but would I do it again? Hell no. Unless you have all the time in the world and the patience of a saint, I would recommend just paying to get them done.

I had originally started to search for invites on Etsy, my place to go for creative wedding ideas, and I found this listing.
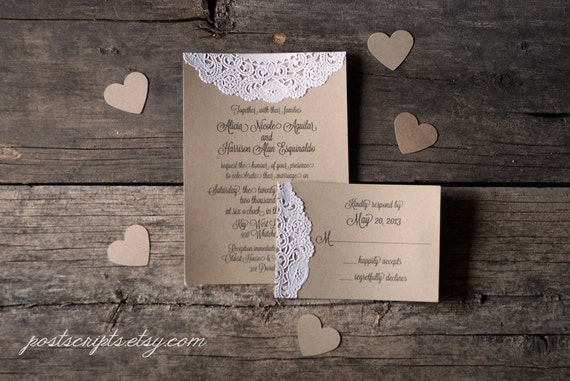

They were almost perfect -- super simple, rustic-chic -- the only problem was the price. The invite shown in the picture above costs $2 alone! (And now I know why she charges that much...sheesh!) I knew I could make these invites myself. I downloaded the Lavanderia font and created the invite and the RSVP postcard. I then bought some brown cardstock, a small paper-cutter, lots and lots of glue, and paper doilies from the cake decorating section at Michael's.

Ba-da-bing, ba-da-boom. A million and twelve hours later and several trips to different Michael's (I bought all the doilies at the Michael's near my house) our invites we're created.


I am really happy with the way they turned out. I just wish they hadn't taken me so long! If you are wanting to make your own invites -- a great way to save a ton of money -- I suggest making them waaayyy ahead of time. That way you won't be rushing to get them done and sent out in time.

Any DIY brides out there?
Did you make your own invites?

Thursday, April 18, 2013

Glitter and Chevron and Pink... Oh My!


I found the above image while perusing Pinterest and I said to myself, "Self, let's try this!" I usually stick to a solid color when I do my nails, but this fun mani was something I couldn't pass up. So I grabbed the goods and got to work.


What you need:
Gelous Advance Nail Gel Coat or a normal base coat (go here to see how I use this product in a mani)
Out The Door Top Coat
A color polish -- I chose Essie's Watermelon
White polish -- I used Essie's Marshmellow
Black polish -- I used Nicole by OPI in Hard Kourt Fashionista from the Kardashian Kolors line
Chevron nail decals
Loose glitter.

Steps:
1) After using a normal base coat or the Gelous system on your middle fingers, paint the nails with your white polish. You want to make sure to do these nails first so that they have plenty of time to dry before adding the chevron patten.
2) I chose to paint my pinkies, pointer fingers and thumbs next. Make sure to do a base coat (or Gelous system) before applying the nail color. Finish off these nails with a top coat.
3) Now, time for the glitter! I used left over loose glitter I bought at Michaels. Paint your ring finger on one hand with a base coat, or two coats of the Gelous Advance Gel Coat. Quickly, sprinkle loose glitter onto the nail before the base coat dries. Gently press the glitter into the polish and brush off excess. Seal the glitter with two coats of a top coat or two coats of the Gelous. Repeat on your other hand.
4) Chevron time. You have two options here. You can either cut the chevron nail decals to fit your nail and seal it with two layers of top coat or you can do what I did. I've found that the nail decals peel off very easily, no matter how many layers of top coat I use. After placing the nail decals onto my nail, I took black polish and painted over the entire nail. Then, very slowly and gently, pull the decals off your nail. Let dry and seal with a top coat.

And there you have it! The final result...


TIPS:
- Make sure the black polish is completely dry before applying a top coat. As you can see, I thought I had given my nails enough time to dry, but did not which resulted in the polish bleeding a bit. Oops!
- This mani takes time. Don't rush it! And make sure you have plenty of time. It's a great project while watching a movie.
- Give the white polish at least an hour to dry. If you don't, the polish will come off when you peel the decals off.

So, what do you think?! Is this a mani you would rock?

Wednesday, February 20, 2013

DIY: Baseball Bracelet


With only 40 days until Opening Day, it's time to dust off the ol' jersey and baseball cap. Just kidding -- I don't wear baseball caps. They make my already fine hair look like I have about 10 strands on my entire head. My fashion don't aside, it's time to get ready for baseball season. You see, when you're going to be married to a Varsity baseball coach, hitting and pitching instructor, and former college pitcher, you have no choice but to be ready for baseball season. So in honor of preparing for the return of America's favorite pasttime, I whipped up a super simple and super fun baseball bracelet.


1) Find yourself an old baseball that no one will miss and an exacto knife.
2) Begin to cut out the seams of the baseball. Leave enough of the leather on either side of the seam so as not to cut the laces. Please, be careful with the exacto knife! I won't be responsible for severed fingers!
3) Use the knife to cut the seam. (Duh, Jenna. Thanks for stating the obvious.)
4) Now, you're going to want to cut the lace holes (or whatever they're called) to make unlacing easier. You can cut the seam to fit your wrist and then decide how many lace holes you need to cut on both sides. Make sure you don't cut the laces!
5) The unlacing begins! As easy as this part is, it get's a little tedious. Unlace until you've reached your desired length. Once you're done unlacing both sides, cut off the excess leather.
6) VOILA! You have yourself a cute little baseball bracelet just in time for Opening Day!

Monday, January 21, 2013

Pearly Whites

If there's one thing I've been obsessed with longer than the train wreck that is the Kardashian's, it is extremely white teeth.

I miss the Florida sun on my skin....sigh
I honestly think my mother threw me on the white teeth train. I remember being a teenager, getting ready for Spring Break with the fam, slapping on those Crest white strips. It was like a drug for me; I was hooked from the very first strip. Well that sounded scandelous.

Unfortunately, for the past couple years, my coffee addiction has skyrocketed. And while it has made my mornings a whole lot more productive, my chompers have suffered. Coffee stained teeth are not cute. I ran out of my trusty Crest White Strips and being the more frugal adult that I have become, I wanted to find a more wallet friendly teeth whitening system.

So of course, I took to Pinterest; it's like Google these days. That's when I stumbled upon something mind blowing. One of those "Why did I NEVER think of this before?!" moments. Would you believe me if I told you that you can get some gorge pearly whites for $1??? Well, you best believe me...

The magic juice? Hydrogen Peroxide.
Yup, that lovely liquid in the brown bottle from the drugstore. Think about it, the active ingredient in all whitening products -- strips, toothpaste, mouthwashes -- is hydrogen peroxide, so why would you spend upwards of $40 for a teeth whitening system when you can just snag a bottle of that goodness for a dollar.

Don't worry, hydrogen peroxide is completely safe to use as a mouth rinse as long as your not drinking the stuff. Simply mix one part hydrogen peroxide with one part water and swish around your mouth for at least a minute. Don't use too much -- the mixture will foam in your mouth -- I usually use a cap full of each. Try not to eat or drink for the next 30 minutes.


I've noticed drastic results since using this mouth rinse. Dare I say I think it works better than expensive white strips? My teeth were noticeably whiter in a few days, whereas it usually took at least a week to notice results with white strips.

Now, do your chompers a favor and swish around some hydrogen peroxide. You can thank me later!


Monday, December 17, 2012

DIY: Glitter Starbucks Tumbler


I had quite a few people ask me about this picture when I posted it to Instagram a while ago. Welp, if you want to know how to get your very own glittered Starbucks tumbler, today is your lucky day!


It is a really easy DIY project. All you need is:

  • A Starbucks tumbler with a removable center. Unless you already have a Starbucks tumbler with a removable center, you're going to have to find one online because Starbucks no longer makes this type of tumbler. I found mine on Amazon.
  • Mod Podge
  • A paint brush
  • Glitter in the color of your choice
 

Here's how you do it:
  • Take the tumbler apart and set the inside cup to the side -- you won't be doing anything to it.
  • With a paint brush, spread mod podge on the inside out the outer cup. Make sure you cover it completely.
  • Pour glitter inside the cup. Cover the top with a piece of paper or cardboard and shake until the glitter has covered the entire inside of the tumble. Let dry for at least two hours.
  • Repeat the mod podge and glitter process two more times, allowing each layer to dry for at least two hours.
Once the mod podge is completely dry (I let mine dry overnight) put the tumbler back together and VOILA!  You have yourself a glitterfied Starbucks tumbler that everyone will love!

Happy Monday, lovelies!

Tuesday, December 11, 2012

At-Home Gel Manicure

I've been itching for a perfect and shiny shellac manicure for a couple weeks, but let's be honest, homegirl can't afford to spend $30 on a manicure right now. With Christmas right around the corner, wedding expenses, and my regular bills, my wallet is feeling a little empty these days.

So of course, I took to my best friend, Google, to find myself a low cost, at-home gel manicure system. I've seen the gel manicure kits that you can buy at drugstores, but even those are a little too pricey for my current budget. But no worries, Google never lets me down. It took me right to one of my new favorite blogs The Sweetest Thing. I may or may not have read post upon post this weekend. The girl behind this blog, Emily, posted detailed step-by-step instructions on how to achieve the perfect at-home gel manicure. Score!

Reasons why I knew I needed to try this:
1) I only needed to buy one product in order to get the perfect gel manicure.
2) I could use regular nail polish that I already had -- no need to splurge on special gel nail color!
3) She recommended my all time favorite top coat! Girl after my own heart...

All you need for this at-home gel manicure is Gelous Advance Nail Gel Coat ($5.99 at Sally's Beauty Supply), any nail color of your choice, a clear top coat ( I use Out The Door Top Coat, which you can find at Sally's Beauty Supply), and a nail buffer.


First things first, remove any nail polish from your nails for a clean canvas. Use a file to shape your nails and clean up any rough edges. Next, buff your nails until they are smooth using a nail buffer. Then remove any nail dust, dirt, or oil from your nail by swiping a cotton ball soaked in acetone (or any nail polish remover) over your nails. Now you're ready to apply your gel manicure. Follow these simple steps:

1) Apply two thin layers of the Gelous Nail Gel to your nails, allowing a couple minutes in between to dry a little bit. After applying your second coat, allow the gel to set. I waited about 3 minutes.
2) Next, apply a layer of your nail color and allow to dry (about 5 minutes)
3) Apply another layer of Gelous Nail Gel on top of your nail color and allow it to set for about 2 minutes so that it's semi-dry. Make sure that the ends of your nails are sealed by swiping the brush over top. This will ensure you won't see a single chip for the entire duration of your gel manicure.
4) Apply a second layer of nail color.
5) Finish it off with your choice of top coat. Stick with a fast drying top coat with high shine for the best results.


TA-DA! A gel manicure for the fraction of the cost! Since I had every product but the Gelous Nail Gel Coat already, I only spent $5.99 for this at-home gel manicure. Can you beat that?

I'm in love with this process. It was so easy, so cheap, and so far, it's holding up really well! I put my gel manicure through the test of all tests....peeling tape off of my desk. This annoying task would be a death sentence for any manicure, but my gel manicure got the job done without a single chip or break!

Try it out! I know you won't be disappointed!

Happy Tuesday!!!

Tuesday, November 20, 2012

DIY: Makeup Removing Face Wipes

Pinterest over did itself once again. When I found a DIY project for makeup remover wipes, I knew I had to try it.

{via}
Before I get into the ins and outs of this easy project, can we please talk about skin care? I know there are days (or shall we say nights) when the last thing you want to do is wash your face before bed. Believe me, I know! But do you know how important it is? Not only will it save your pillows from the wrath of your makeup but it will save your skin from breakouts and early aging! While you're sleeping, your skin is working overtime to repair itself, but how is it going to do that if you still have your makeup, dirt, and oil from the day clogging your pores! So do your skin a favor and take that make up off every night. If you're like me, once you get in the habit of taking your makeup off nightly, you won't be able to go to sleep without doing it.

One of my favorite ways to take my makeup off is by using makeup removing face wipes because it's easy and quick! But have you ever noticed how expensive face wipes are?! My personal favorite was the Olay Cleansing Cloths for sensitive skin and they run upwards of $10 a pack (depending on where you buy them).

How would you like to make your own super cheap and super amazing makeup removing wipes? Oh, well perfect because I can tell you how! (Go ahead, thank me endlessly in the comments....jokes).

Here's what you need:
*1 roll of paper towel, cut into thirds
*3 cups of warm water
*1-2 tbsp of coconut oil
*Some type of container to keep your wipes in, I used tupperware similar to the one pictured above

Cut off one third of the paper towel roll and place it in your container. Mix the water and coconut oil together and pour into the middle of the paper towel roll. Put the lid on your container and tip upside down to evenly distribute the mixture. The cardboard tube in the middle should be loose enough to pull out at this point. Let the wipes sit for a couple hours before you use them to allow the paper towel to soak up the mixture, and voila! You're ready to take off your makeup!

Coconut oil is amazing for taking off makeup, especially eyeliner and mascara. It's also a natural antibiotic and soother so it's perfect and gentle enough for both sensitive and acne-prone skin. There's no need to rinse your face after using the face wipes. The coconut oil will leave your skin super soft and moisturized! I usually smooth a little more coconut oil over my face afterwards because my skin is super dry.

So do your skin, and your wallet, a favor and get on these DIY makeup removing face wipes. You can thank me later...

**All you mommas out there, you can use this same recipe to make baby wipes! Just add a couple squirts of baby soap. You have an all-natural wipe for your bundle of joy and you're saving yourself some serious dough!**

Tuesday, October 9, 2012

All That Glitters


Who wouldn't want all of those diamonds? Us girls love our jewelry, especially anything that sparkles. Whether it be your engagement ring, those diamond studs your parents gave you as a gift, or that ruby ring passed down from your grandmother, the dirt and grime of daily life can really dull the sparkle. A lot of jewelry stores will clean your jewelry for free, but why make an unnecessary trip when you can clean your jewelry at home! I found this cleaning method on Pinterest (obvi) and ladies, it's so simple. All you need is dishwasher detergent, warm water, and a soft bristle toothbrush.

We buy our dishwasher detergent at Sam's hence it's ginormous size, and yes, I bought that toothbrush at Kroger.
Mix three parts warm water with one part dishwasher detergent. Dip your toothbrush in the mixture and scrub your jewelry, making sure to get in all the crevices. It's very important that you use a soft bristle toothbrush so you don't scratch your jewelry! If your jewelry is extra dirty, let it sit in the mixture overnight. When you're finished cleaning, rinse and dry your jewelry and, TA-DA! Your jewelery is as sparkly as the day you first got it!

Okay, so you can't capture sparkle on an iPhone, but I promise my bling is blinding me after using this cleaning method!
So get out that dishwasher detergent and start scrubbing those jewels! Happy Tuesday, lovelies!

Thursday, October 4, 2012

Love Your Locks

We all want beautiful and healthy looking hair and we'll go to just about any length to get it. All of those products and treatment's can get pretty expensive, and before you know it, your hair looks nice but your wallet is pretty empty! Why spend hundreds of dollars on salon products and treatments when you can make your own with things you have in your kitchen? I want to share with you some of my favorite DIY hair masks that will make your hair look healthy and beautiful and keep your bank account full.


Egg and Olive Oil Mask

The egg and olive oil mask will not only make your hair super soft and shiny, but the protein in the egg promotes hair growth! Mix two egg yolks with two tablespoons of olive oil and dilute the mixture with a cup of water. Massage the mask into your scalp and hair and let sit for 30 minutes. Rinse and shampoo! Just a warning, you might want to wrap a towel around your neck while letting the mask sit, unless you're cool with olive oil and egg dripping all over you. I did this mask last night and my hair instantly felt so soft.

Olive Oil and Honey Hydrating Mask

Now that the colder seasons are upon us, we'll be turning the heat on inside our homes and cars before we know it. You may have noticed that heat sucks the moisture right out of our hair. Well, now you don't have to worry about dry hair anymore! Mix equal parts of olive oil (warmed in the microwave) and honey and apply to wet hair. Put your hair in a shower cap to keep warmth in. If you don't have a shower cap, wrap a plastic bag around your head, just don't be stupid and put it over your face. Let the mask sit in your hair for 15 minutes. It's recommended that you rinse your hair and condition as usual, but with my fine hair, I need to shampoo! Otherwise, I look like I dipped my hair in some french fry grease.

Avocado Mask

We all know avocado is a super food and super good for you, so naturally it's good for your hair too! This mask will make your hair so soft and shiny, everyone will be asking what your secret is! Mix one mashed avocado, one tablespoon of olive oil, and one tablespoon of honey together in a bowl. Spread the mixture all over damp hair and slip on a shower cap (or a plastic bag...safely! I don't want people suffocating because of my blog post!). Let the mask sit for half an hour, rinse, shampoo, and condition.

VOILA!

Now you have gorgeous, healthy, and shiny locks! Do you have a DIY hair mask that you love? Please, share so I can try it!

Peace, love, and gorgeous hair!
 

Thursday, July 26, 2012

I Actually Crafted

Ladies, a couple weekends ago, I actually crafted. This. Is. Big. You see, I have a weird insecurity about crafting. I always want to try all this amazing DIY projects, but I'm afraid of failing. Nothing is more depressing than spending your time trying to perfect a project and then it turns out like a pile of cow manure cover in flies. But, I put my insecurity aside and started a DIY project, a twine-wrapped letter door hanger (which I saw on Pinterest, obvi.) And, I must say, it turned out great!


What do you need? A wooden or cardboard letter found at any craft store, jute twine, scrap fabric, a hot glue gun, and ribbon. That's it, that's all!


How to start? Hot glue the twine around the top of the letter. This will keep the twine anchored as you begin to wrap the letter. From here, just wrap the twine around the letter! Be patient, it's tedious and takes some time. I had a hard time keeping the twine wrapped around the curved part of the 'J', so I just used some hot glue where needed.

This is what your letter should look like when you're finished wrapping it with twine! Easy, peasy! Now it's time to make the fabric flowers. I picked up some scrap, off-white fabric at JoAnn Fabric's for $1. Simply cut a long strip of fabric...


Fold the strip of fabric in half, long ways, and begin to roll! I like to gather the fabric strip to make the fabric flower look a tad more like a flower. When you have the fabric strip rolled to look like you would like, hot glue the end of the fabric to the back of the flower. Let the hot glue cool before gluing it onto your letter. I made three fabric flowers, you could make as many or as little as you would like.


The hard part (which isn't really even hard) is over! Now all that is left is securing the ribbon onto the back of the letter with hot glue...


...and tie the ribbon into a bow. I put a little bit of hot glue inside the bow to keep it from coming apart in the future. And voila! You have yourself a super easy, and super cute, door hanger!


You can make this yourself, or if you're like me and a little on the lazy side with DIY projects, I've set up a super professional (that's me being sarcastic) Etsy shop where you can purchase one of these lovely door hangers from Yours Truly! You can find it here. And please don't judge the bareness of my Etsy page. It's a work in progress, a.k.a. I'm too busy to make it look nice right now!


Tuesday, July 17, 2012

Sponsor Post - Darci from Harlow's Exclusive

Let me quickly introduce you to one of my newest sponsors, Darci! She blog's over at Harlow's Exclusive. This lovely lady has an eye for beauty and you can see it all over her blog posts! She's here on Yours Truly today to share with us a super cute and super easy DIY project! Stop by Darci's blog and show her some love!

Hey everyone! I'm Darci from Harlow's Exclusive. I am a college graduate with a degree in anthropology who recently had a major life change: I'm going back to school for interior design (yay)! Harlow's Exclusive is where I share my love for beautiful interiors, color schemes, Pinterest and of course, great DIY projects, which is what I'm showing you today. 

I know sooooo many people who say that they don't have the gift to make something out of nothing, so I am here to show you how easy it can be with just a few, inexpensive items!


I'm going to show you how to make a wine bottle vignette!
Of course to start you need some wine bottles, or any other glass bottles. To get the labels off of the bottles soak them in hot water for about twenty minutes. Usually they peel right off, and you can use a little scrubby to remove the rest. Let them dry.


Pick out the color spray paint you would like to use. I used Rust-Oleum's Ivory Silk and Heirloom White in a Satin finish. 

 
I used an old shoe box as a platform and closed the bottle opening with tissue paper. Spray the bottles from top to bottom in sections moving around the bottle rather than moving the bottle itself. Allow the paint to dry and then spray again. 


I am a huge animal print fan, so I thought it only natural that I decorate them with some cheetah print. 
You will need black and metallic gold acrylic paints, found at any craft store and most superstores, as well as two small paint brushes. Depending on the size you want your spots you could also use toothpicks or cotton swabs.


To create the cheetah spot I made a small circular shape, not a perfect circle, with the gold paint and surrounded it almost completely in black using a dabbing motion. You want to leave some areas around the gold open. 


It should end up looking something like this. I went at random around the bottle adding the gold circles and then came back with black. Put as many or as few as you like.

I didn't want to put the cheetah print on all of the bottle so I left one plain and painted a small band using the gold metallic paint around the neck of the other. This gives you some variety.


 To complete my vignette I got a small metal tray from the dollar store, spray painted it gold and arranged the bottles on it. I also got some clearanced flowers from JoAnns and put them in the bottles for a pretty pink pop.

And there you have it! A beautiful and simple vignette made from wine bottles.

You can connect with me here:


Wednesday, June 6, 2012

Oh How Pinteresting and Other Lovelies

Before I participate in my all time favorite link-up, I want to share with you a little find that has brought me so much happiness. It's sad, really, how happy a cute shirt makes me! Recently, I went to Kohl's with Justin to buy some jeans that he'll be wearing in a wedding later this summer. I walked past an adorable cream, lace dress that was on sale!!! Unfortunately, they only had an XS and an XL left, and since I won't fit in either of those, I walked away with my head down. I hit up another Kohl's to see if I could find the same dress in another size, but with no luck, I ended up wandering around. I came across Lauren Conrad's line and absolutely fell in love with this shirt! And, to make things better, it was on sale! I love a good sale!! It's probably the main reason I love this top so much.

Shirt: Lauren Conrad for Kohl's // Jeans: Forever 21 from Plato's Closet // Gladiator Sandals: Forever 21 // Bracelets: H&M and Forever 21
Don't mind the blue stains on my bracelet. The toddlers painted with watercolor and it, obviously, got all over the place. I don't know why I insist on wearing nice things to work.

I'm also really excited about these Madden Girl Banterr Sandals! I found them at TJ Maxx at half of their original price! You can call me Ms. Bargain.


Okay, so now on to the most important thing... OH HOW PINTERESTING WEDNESDAY!!!

 Link up with Michelle to join the fun.

This weeks theme revolves around DIY projects that I love! And let's be honest, that I'll probably never actually do! Maybe that will be my mid-year resolution.

{old pallet art}
 

{headband holder made from an oatmeal canister}
 

{doily lamp}
  

{window pane picture frame}
 

{aluminum luminaries}
 

{canvas wall collage}
 

{front door wreath}
 

{gift in a jar}


Happy Wednesday!

xoxo, J